Inter Addition
In the Audiveris data model, an Inter instance represents an interpretation, that is a candidate likely to become a musical symbol in the end.
A manually created Inter is flagged as MANUAL and cannot be called into question by the OMR engine, it is considered as certain.
We can manually create an Inter instance from a selected glyph, by “assigning” this glyph the desired shape. If we have no suitable glyph available, we can still create an Inter from nothing, via a simple drag & drop from the shape palette.
In both cases, we may have to specify the target staff for the created inter if the context is not clear enough for the engine.
Table of contents
- Inter from underlying Glyph
- The Shape Palette
- Shape cache
- Repetitive input
- Relations with other inters
- Shortcuts for inter addition
Inter from underlying Glyph
Inter creation from a glyph is the only case where a glyph is used in Audiveris manual editing.
The set of black pixels of one or several selected glyphs can be transcribed as one inter, by specifying the target inter shape. The precise location and bounds of the new inter are defined by the underlying set of pixels.
This method of selecting a glyph to “assign” an Inter to it, requires of course that a suitable glyph be available. In we can’t find any such glyph, we’ll have to drag & drop the desired shape from the shape palette instead.
Also, knowing the target location is not always sufficient to detect the Inter target staff. Several heuristics are used by the software, but if they fail we will be prompted for the target staff:
The target shape can be specified via different means, as follows.
Via the glyph classifier
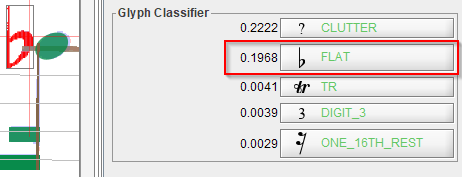
This classifier automatically operates on the current glyph, be it the single selected glyph or a transient glyph built on-the-fly from a multi-glyph selection.
Chances are we’ll find our desired shape in this top 5. If so, we just press the shape button.
In order to use this method, the target shape must be handled by the glyph classifier (based on a neural-network).
This is NOT the case for the following shapes:
- Lines (staff lines, ledgers, barlines, stems, slurs, endings) use ad-hoc methods,
- Beams use image morphological closing,
- Note heads use template matching,
- Texts use OCR.
The top 5 is just a raw output of the glyph classifier, which runs on the glyph in isolation, that is without taking the neighborhood into account.
This means that:
- a dot (augmentation, staccato, …) will be at best recognized as DOT_set,
- and a half or whole rest as HW_REST_set.
For these two cases – and only for them – the glyph classifier is not precise enough.
We’ll have to explicitly select a more specific target shape, via the glyph popup menu or via the shape palette.
Via the glyphs popup-menu
Once a glyph has been selected, we use a mouse right click to access the sheet popup menu, and its Glyphs sub-menu.
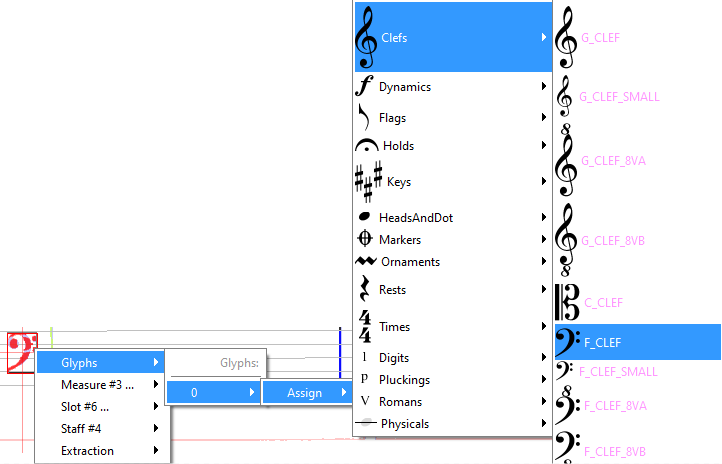
Then we navigate through shape sets to our precise target shape.
Via the shape palette
The shape palette (see next section) allows to assign a shape to the selected glyph. This is done by a double-click on the desired shape in the palette.
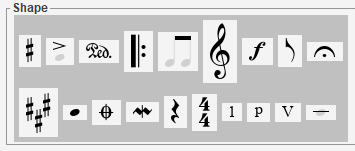
The Shape Palette
The palette offers the ability to choose the desired shape for a selected glyph.
And even if no precise glyph can be selected, we can directly drag a “ghost” Inter from the shape palette, located on the right side of the sheet view, and drop this ghost at the desired target location.
The starting aspect of the shape palette is a catalog of all shape sets. It exhibits a dark-gray background, with one representative button for each shape set. Nothing can be dragged from this catalog, we must first select a shape set:
Entering a shape set
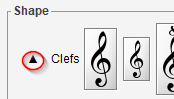
Pressing a shape set button replaces the catalog view by a specific palette dedicated to the selected shape set. For example, pressing on the ClefsAndShifts set button gives:
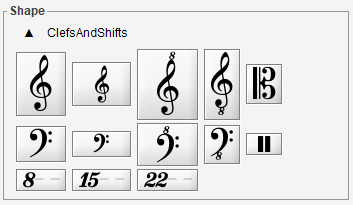
Within a set, a shape can be:
- Assigned (by a left double-click) if a glyph has been selected,
- Or dragged and dropped to a target location.
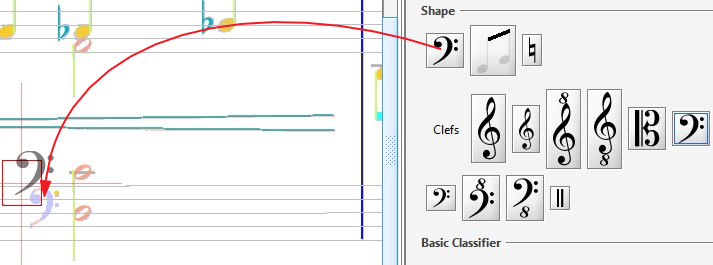
Selecting target staff
While we are dragging a shape, we have the freedom to hover where we like. The last staff we have been hovering over is selected as our current target staff.
Before we “select” a staff, the dragged shape “ghost” is displayed isolated in dark-gray.
Once a staff has been “selected”, a thin vertical red segment goes from the shape center to the target staff middle line, the shape turns into the Inter selected color, additional objects can appear – such as intermediate ledgers or potential relations with nearby inters –, it may get snapped according to staff lines, etc.
| before staff selection | after staff selection |
|---|---|
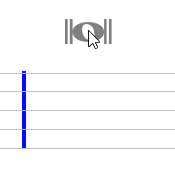 | 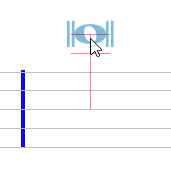 |
We can drop the shape only when a staff target has been selected. If not, the drag & drop action is abandoned.
Case of compound shapes
Note the HeadsAndDot set now contains four new shapes located at the end.
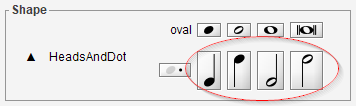
These are quarter notes and half notes, with stem either up or down. There are called “compound” because they combine two shapes: a head shape and a stem shape.
They are generally more convenient to insert as a whole, the head can still be snapped on staff line or ledger and the stem can still be automatically linked to beams nearby.
Once dropped, such a compound shape is replaced by two separate Inters (head Inter and stem Inter) linked by a HeadStemRelation. We can then later edit each “part” separately, for example to modify the stem length. And we can add flags to the stem.
Exiting a shape set
To leave the specific set palette and go back to the catalog view, we can:
-
Click on the “triangle-up” sign located on the left side of the set palette,
-
Or press the
ESCkey on the keyboard.
Shape cache
We can notice, appearing on a line above the shape palette, the list of the most recent shape buttons we have used so far.
These cached buttons are meant for further direct access, avoiding the navigation to their containing sets.
And if we want to add many Inters of the same shape, we can consider using the “Repetitive Input” mode below.
Repetitive input
If we have numerous Inters of the same shape to add in a row, a convenient way is to switch temporarily to the “Repetitive Input” mode.
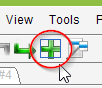
We click on the toolbar icon or select the menu item Sheet | Toggle Repetitive Input or use the shortcut Ctrl+Shift+N and this mode is now set on.
From that point on, pressing with the left-button anywhere on the sheet will add a new Inter (with the latest shape used) at the designated location. We can shift the Inter location precisely, then release the mouse when we are satisfied.
If we press the left-button again, yet another instance will be created, and so on. That’s the rule, so let’s mind our mouse press actions!
The latest Inter inserted is left in “Inter editing mode” with its editing handle(s) displayed. We can press the Enter key to finish this edit, or click somewhere else to create another Inter.
This repetitive mode is meant for simple shapes – like a head, a rest, an accidental, etc. – that don’t require any further resizing.
But what if we really need to resize the inserted Inter? We simply set the repetitive mode off, so that we can press and drag the inter editing handles. Then we set the repetitive mode on again if so desired.
To exit this rather specific mode, we toggle the mode (via the toolbar icon, the menu item or the shortcut).
Relations with other inters
Key relation(s) with the nearby Inter(s), if any, will be updated automatically as we create – or later edit – the Inter, but only as long as the required geometrical relationships can apply (for example, as long as an accidental is sufficiently close to a note head on its right side).
If the relation constraints are not met, we will have to set the relation manually afterwards.
Shortcuts for inter addition
In order to make long editing sessions easier, there are a few shortcuts to assign interpretations without having our hands leave the keyboard.
They all work with a sequence of 2 strokes:
- The first stroke selects a set of shapes.
The selected set content appears in the right column. - The second stroke selects a shape within the current set.
The selected shape appears first in the shape cache.
Example: Let’s press h (heads) then b (black) and we get the HeadsAndDot set content displayed and the black head shape in the cache.

If we had a glyph selected beforehand, this glyph is assigned the selected shape. If not, no glyph gets assigned, but the shape cache now presents our selected shape in first position, ready for further use (via double-click, drag & drop or repetitive input).
Shortcuts table
Only sets and shapes that are used rather often are supported.
| 1st key | Set | 2nd key |
|---|---|---|
| a | accidentals | f (flat), n (natural), s (sharp) |
| b | beams | f (full), h (half), 3 (triplet) |
| d | dynamics | p (piano), m (mezzoforte), f (forte) |
| f | flags | u (up), d (down) |
| h | heads | w (whole), v (void), b (black), d (augmentation dot), h (half-note), q (quarter-note) |
| r | rests | 1, 2, 4, 8 (full, half, quarter, eighth) |
| p | physicals | l (lyrics), t (text), a (slur above), b (slur below), s (stem) |